
Whiteboard videos are an excellent way to engage your audience and explain complex ideas or systems. The simple drawings and narration have a way of engaging people and evoking the feeling that it’s being drawn live just for them. This approach removes a lot of the extra noise involuntarily created through other mediums and allows the viewer to focus solely on the core concepts.
Below are some key elements you’ll need for your whiteboard video to shine.
PRE-PRODUCTION
Develop your story
A great video, no matter the medium, always starts with a solid structure and intentional messaging. Put as much work as you can into the script before filming, to avoid unnecessary and time consuming changes during production. Remember to work out your voice over and time it. This will give you an idea of how many designs you’ll need to get across the finish line.
Decide on visual theme and style
If you have a budget, invest it into an experienced illustrator. Bring the artist onboard with your finished script to help develop the visual ideas, style and characters. Have them draw rough storyboards for each section so that you can clearly see and approve the visual flow. After finalizing the artwork, you’re ready to film!
PRODUCTION
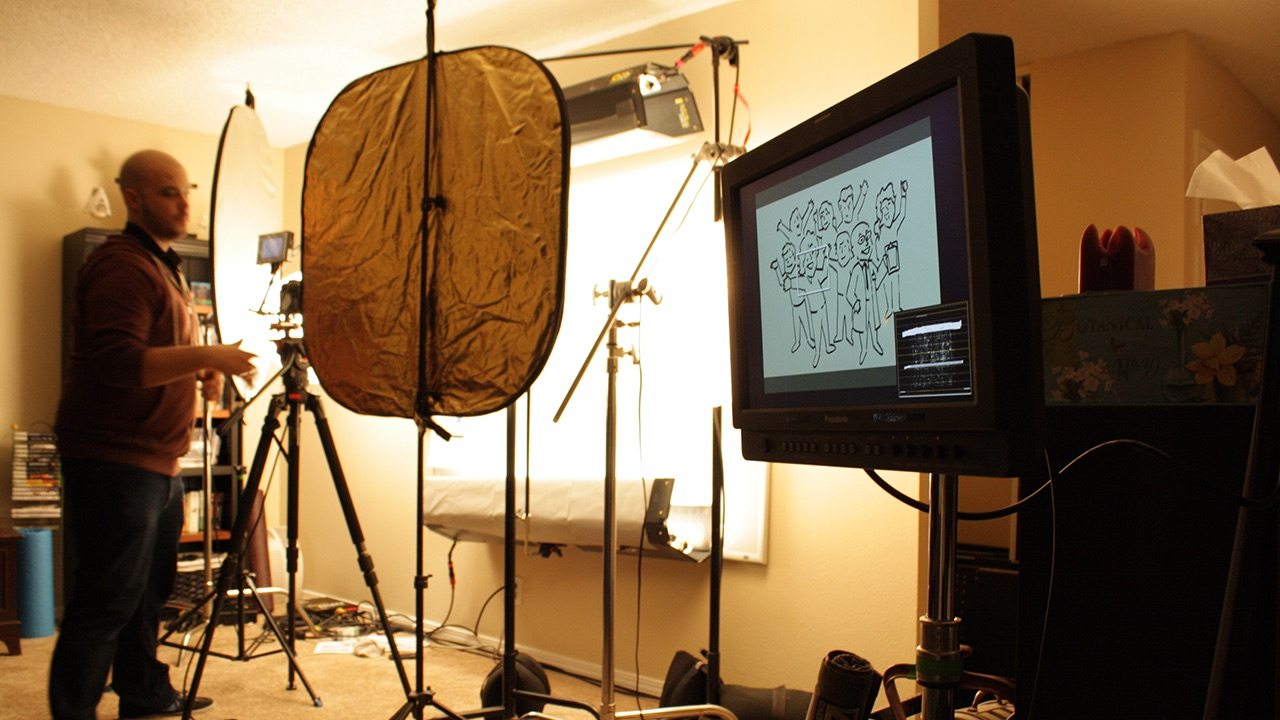
Equipment List
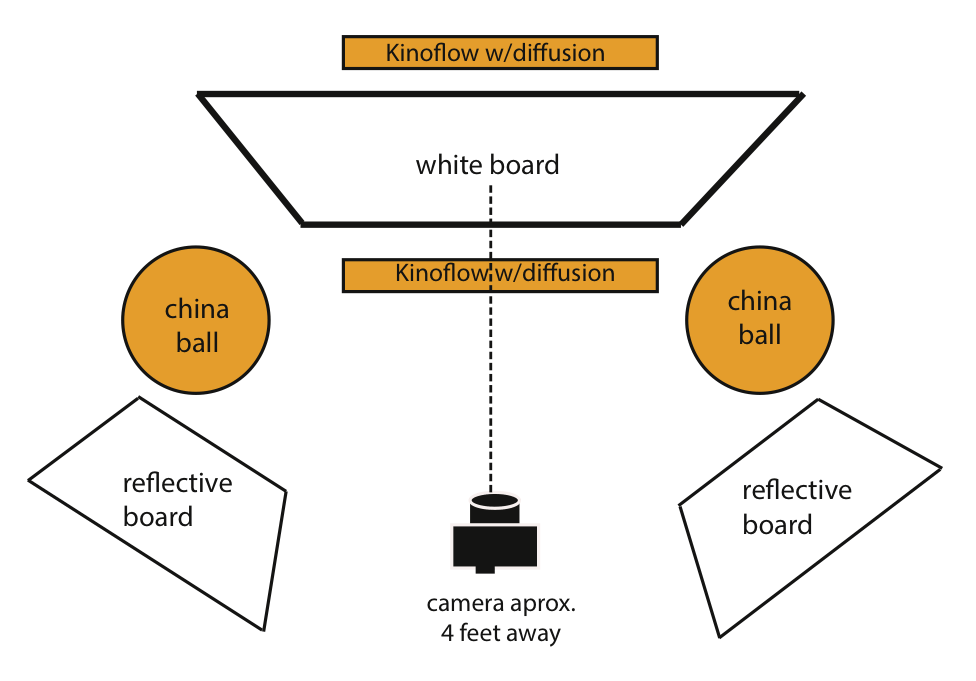
- (1) HD Camera
- (1) Tripod
- Lights: (4) 4×2 Kinoflos. (We supplemented with 2 china balls)
- Diffusion for Kinoflows. You can pick this up at a theatrical lighting store.
- (1) Whiteboard, preferably 6×4. Make sure your whiteboard does not use a Melamine surface, it will produce an undesirable streaking effect.
- (2) Reflective bounce boards.
- (6) C-stands to hold up lights and bounce boards.
- (1) HD monitor. Helps with focus and framing but not required.
- Clamps and sandbags to safely hold equipment in place.
Lighting
The diagram below is just a guide, adjust as needed.
Shoot with cropping in mind
Your camera needs to shoot in 1080p or higher. This is important to give you the best choice for cropping and reframing each shot later. On some of the bigger illustrations this will give you ability to move along from left to right or top to bottom, following the drawings as they materialize. Keep in mind, when using this method you will be outputting at a lower resolution – in this case, 720p – but that’s usually fine for internet video. Your camera should be set to record at 29.97 fps, the higher frame rate will minimize motion blur.
Test your method, workflow and result
Before your illustrator spends the day drawing the entire story, make sure your settings are dialed in. Practice without the artist by drawing a quick sketch yourself. Then import the footage, cut it together and make sure there’s no glaring problems with camera settings, lighting, timing etc.
The illustrator will use the storyboards for reference and recreate the drawings on the white board. That’s the secret to getting that clean look, the illustrator has already worked out all the details and is simply recreating them. This phase can take a while but once you and the artist get into a groove it’ll start to speed up. If you have a lot of drawings, it may be good idea to split the production phase into two days.
POST-PRODUCTION
Adjust the timing
Import the footage into your editing program and after choosing the best takes, insert them on the timeline and add the voice over audio. Adjust the timing and you may be pleasantly surprised with new ways the video comes alive. If you’re having problems matching the visuals and audio, don’t worry. You can adjust the timing to your liking by speeding up or slowing down certain clips and holding on completed drawings for a few extra seconds. Adding slow zooms and pans will help to keep it visually interesting.
Adding animation
Crop the shots as needed to best display the artwork and story. Techniques for adding animation vary but all rely on the use of a compositing program such as Adobe After Effects. Work with your artist by explaining any animation ideas so that they can draw certain elements separately if necessary. By filming individual elements, you can key them out with an alpha matte—since your background is solid white—and place them over other drawings in After Effects. The stop-motion look comes from speeding up the footage and lowering the frame-rate at the same time, preferably to around 10 frames per second. Play with the timing to find a style that feels right for your video.
I hope this gives you a good foundation to get started on your own ideas! Put in a little effort and you’ll have a bonafide whiteboard video in no time.